Congratulations, you’re on the right path to save a ton of time by automating scheduling for your team. SUMO Scheduler has a lot of functionality that you may choose to implement.
FOR USERS:
Learning SUMO is as easy as watching the Basic Training Videos right now.
FOR ADMINS:
Getting up and running on SUMO is a simple four step process:
STEP 1: GET FULL ACCESS TO THE KNOWLEDGE-BASE!
First make sure you get access to the full KnowledgeBase.
STEP 2: COMPLETE PREREQUISITES
First, you will need to take 10-15 minutes to complete this following Prerequisite Setup steps to prep your org for the SUMO installation.
In order to install the SUMO Package you must first enable the following Salesforce Features.
Chatter
Chatter must be enabled, especially a new org. You can do this by going to Setup | Build | Customize | Chatter | Chatter Settings and enable.
Shared Activities
SUMO allows for you to schedule Appointments against multiple Leads, Person Accounts and Contacts at a time. Enable this feature to allow Salesforce to accommodate for relating 1 Lead or up to 50 Contacts at a time. Salesforce may also reference this feature as it appears on the page layout: Allow Users to Relate Multiple Contacts to Tasks and Events.
- More about this Salesforce Feature
- Known Salesforce Issue
- From Setup, navigate to:
- Lightning: Feature Settings | Sales | Activity Settings.
- Classic: Customize | Activities | Activity Settings
- Select the checkbox next to Allow Users to Relate Multiple Contacts to Tasks and Events.
- Add the Name related list to the Event Page Layout(s).
- Lightning: Only add this via Classic. If you use Lightning Build App Pages for Events, the related lists should still be determined from the layout in Classic.
- Classic: Customize | Activities | Event Page Layouts
- Click Edit
- Add the Related list “Name” to the related list section on the layout
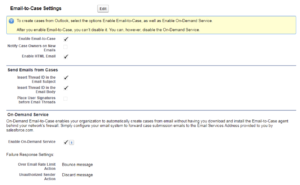
Email-to-Case
SUMO offers sending an Invite from a Case (through email-to-case), to be tracked in HTML Emails and when a customer replies it will be posted as a Case Comment. See the SUMO Additional Configuration Guide on more information on these features.
- From Setup, navigate to:
- Lightning: Feature Settings | Service | Email-to-Case
- Classic: Customize | Cases | Email-to-Case
- Select the checkbox next to Enable Email-to-Case
- Select the checkbox next to Enable HTML Email
- Select the checkbox next to Insert Thread Id in the Email Subject & Body
- Select the checkbox next to Enable On-Demand Service (if you do not, there is custom development required for other options Salesforce supports).
- Choose your Failure Response Settings
If you are sending Case Invites you will need to configure your Support Process and Support Settings before this installation is completed and can be done at a later time.
Enhanced Email
- From Setup, navigate to:
- Click Customize > Email > Enhanced Email
- Click Enable
More information on Enhanced Email can be found on the Salesforce Help & Training Website at https://help.salesforce.com/articleView?id=enable_enhanced_email.htm&type=5
Contact Record Type
- If you do not have at least one Contact Record Type, please export a list of your Contacts and get an update file ready that denotes what your existing records, new record type should be after SUMO is installed. We recommend getting ready for this now, before you install. SUMO comes with a “Contact” or “Customer” record type. If you do not have at least one Contact Record Type, make sure Dummy Contact is included in your update.
Graphics
- Company Site Logo (75×200) File Size Limit to 135KB
- Company Email Header (600×105) & Footer (600×28)
Salesforce Administrator Access
- Administrators installing and/or managing SUMO must have a standard salesforce System Administrator Profile. If you have a custom administrator profile and run into issues, please reach out to SUMO Support for assistance. Some capabilities are only available on System Administrator Profile.
STEP 3: SCHEDULE & PERFORM YOUR INSTALL
Congratulations! You are now ready to work with the SUMO Support staff to start the installation.
Install Policy
Part of the power of SUMO is that you get your own copy that you can can customize for your business.
- One Free Install – If you already have a Salesforce org we will install SUMO into your sandbox –or- production environment for you once at no cost. This does not include the setup process, which is unique to every customer depending on your requirements. Once installed, you may follow the Admin Setup Guide to configure your locations, services, service providers, work shifts, online scheduling site, and more. It’s recommended that you follow the SUMO Implementation Checklist. Larger roll-outs may require our Professional Services Team to purchase Implementation Assistance. Contact us to discuss options.
- Does Not Include Conflict Resolution – While rare, should we be confronted with errors installing SUMO into your sandbox –or- production environment, which is based on your custom configuration or limits you are hitting in your Salesforce org, conflict resolution may be billed at a pre-agreed hourly rate to troubleshoot and resolve.
- Additional Installs $995 – Unless you have a Custom SOW (Statement of Work) that covers this, additional installations will cost $995 per install. Therefore, if you require an installation into sandbox and production that counts as two installs. If you have more than 1 sandbox, then see the Implementation Package option below.
Instructions
Installing SUMO currently requires assistance from our customer support team. To start this process, you will need to submit a case with our customer support team or send an email to install@sumoscheduler.com with the subject SUMO Install Request.
It’s critical that you provide us the following six key attributes in your email (or case):
- Number of SUMO licenses and types you have purchased
- Org Name
- Instance Type (Production or Sandbox)
- Org ID
- Area Code – If you purchased Text & Voice Reminders, you will need a phone number. Let us know your area code preference. We will try all available numbers for that area code first, but all individual numbers are subject to availability at the time.
- Install For You or Jointly – Please specify which option you would prefer and provide the required details:
- Install For You — You will need to create a Salesforce Admin user for our Support Team to login and install SUMO. The email address must be services@sumoscheduler.com so our team may finalized the login credentials.
- Jointly Install Together — Simply state that you would prefer this option, and we will schedule a web conference call and perform the installation using your admin login with screen-sharing.
STEP 4: PERFORM THE IMPLEMENTATION
Once SUMO is properly installed into your Salesforce Org, you may following the SUMO Implementation Checklist to complete the setup.